


Blender tutorial: Winter scene : 3/3
Notice: This tutorial really needs to be updated, I'll try to do it asap.
- Part 1: The Snowman
- Part 2: The fir trees
- Part 3: The scene setting and render
21.
Let's start with the camera.
Select it, and try to point it at the snowman (with G and R), so that you can see the
snowman and also the forest. You can go in the camera view (0) to help you (you can move
the camera while you're in this view). The easiest way is to divide the 3Dview in 2 parts,
one to display the camera view, and the other one to move the camera and see the changes.
Here I show you the place I choosed to put the camera.

22.
This part is a little more difficult, because the quality of the image could change a lot
depending on the lights, and there's not "magical tip" that will make the lights always
looks right, in general you'll have to try many times before having something good.
Select the light/lamp (the kind of small yellow circle with a yellow dot inside that you
can see on images [18.] and [19.])
Then go to the shading menu (F5) and click on
"Lamp Buttons" (the square button with a lightbulb). Select "Sun" (one of the green button
on the left). Then try to place it (G and R) somewhere where is would light the scene
enough. (as in image [19.] for example... Don't forget to try rendering (F12) to see what
it looks like).
You'll notice that the "sun" doesn't cast shadows. Only "spots" can do that [Note:
this was true when I first wrote that tutorial. In the last versions of Blender, every lamp
has a "Ray Shadow" that allows to cast shadows (you had to had the "Ray" button selected on
the scene panel). Unselect "ray shadow" from the sun lamp if necessary]
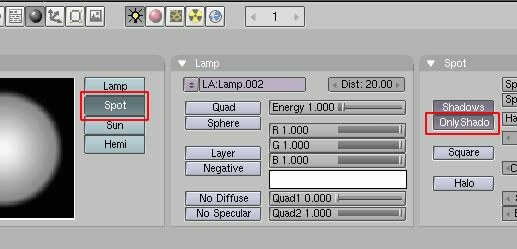
Add another lamp (Add>Lamp), and in the same menu as before, click on "Spot", and
then on "OnlyShadow", so the spot will not light the scene, only add shadows to it.
23. Try to place the spot approximately at this place with the grab (G) and rotate(R) tools. (I colored the snowman in red to show where it is) Still in the Lamp menu, tweak the values of "ClipStart" and "ClipEnd", so that the 'line' comming from the spot is tightened around the objects of the scene. (Inscrease a bit the value of ClipStart and decrease a bit the values of ClipEnd. Without that, some of the objects may have a strange shadow, or no shadow at all). You could also increase the size of the spot ("SpotSi") and its distance ("Dist").

24. Select the camera, and on the shading menu (F5) try to make the "world" color looking sky-blue.

25.
On the Scene menu (F10), select "OSA" (this will enable anti-aliasing). The 5,8,11,16
buttons below set the quality of the anti-aliasing (the highest, the best). Also select
the "100%" button to render the image at 100%, and then change the values of the SizeX and
SizeY (this is the size of the final image). Then you'll only have to click on the big
"render" button (or F12) to star the rendering.
To save your image, press F3 after the rendering.

26.
Here is what it should look like :)
You'll find the Blender source of this scene in here: src/snow_scene.blend .
I added some fancy stuff on the last layer (the one on the bottom right) so you can try
some renderings with the 3 layers + this one.

----------

This work is licensed under a
Creative Commons Attribution-Share Alike 3.0 Unported License.


/http%3A%2F%2Fstorage.canalblog.com%2F98%2F82%2F574603%2F36207057_o.png)
/http%3A%2F%2Fstorage.canalblog.com%2F53%2F00%2F574603%2F36206317_o.png)
/http%3A%2F%2Fstorage.canalblog.com%2F17%2F98%2F574603%2F36158765_o.png)
/http%3A%2F%2Fstorage.canalblog.com%2F60%2F14%2F574603%2F36157979_o.png)
![[18.]](https://storage.canalblog.com/21/72/574603/36158818.png)
![[19.]](https://storage.canalblog.com/59/52/574603/36158827.png)