


Blender Tutorial : Octopus with Subsurfs : 1/2
Last update : April 2007, for Blender 2.43 - it really needs to be updated as many things changed.
This tutorial will teach you how to make a little octopus, using the "subsurf" functionality.
This functionality allows you to create smooth/organic shapes rather easily. If you don't know the
subsurf function, the first part of the tutorial may seems to you very strange, because you're
going to create a shape full of angles and looking like an abstract modern sculpture - instead of
a smooth octopus. But then the magic of subsurf will take effect ;)
By the way, I don't have any diploma in octopus anatomy, so forgive me if that octopus looks weird. :)
This tut will also show you how to assign 2 materials to an object.
I still use the same notation as in the previous tutorials : "Press the
X key to...." for a new shortcut, and only " (X) " when I use this
shortcut again.
- Beginning the modeling
- Adding the subsurfs
Beginning the modelling
1.
First, on the top view (7) add a circle (space bar > add > mesh > circle).
Choose 8 vertices.

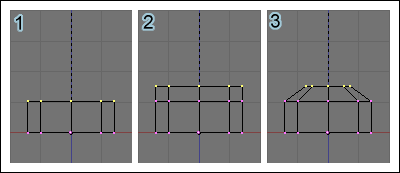
2.
On the front view (1), with all the points selected, press the E key, and click on Extrude - Only Edges.
Then move your cursor up to move the new points as shown on the image
#1. This part is going to be the "body" of the octupus (though now it
doesn't look like it).
Press the E key a second time and move the points as shown on the image #2.
Now, resize (S) the last part as in image #3.
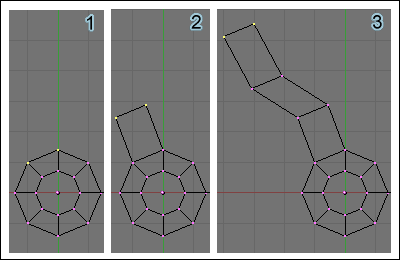
3.
Go back to the top view (7), and select (A/B) the points displayed in yellow on the image #1.
Then extrude (E, Extrude - Region) them as in #2.
(During the extrusion, the move is limited to one axis. If you want
to move the vertices freely, do a single click with the middle mouse
button)
Extrude the points and move them some more to get something looking
like what you see on image #3. This strange shape is an octopus
tentacle - yeah.
4.
Repeat the same process as in [3.], but with all the groups of points, so you'll get something looking like this.
Now, this might start to look like an octopus, but a very abstract one :)

5. Select (B) all the points in the middle, and go to the front view (1).

6. Press the o key (the letter "o", not "zero"). You should now see a new icon on the header.
If you click on it, you'll see a menu with the choice between different types of Falloff.
The "falloff" is the way the points that are not selected will follow
the movement/size of the points that are, depending on their distance
to them.
I don't think I need to explain the difference the different types, the little icons are self explanatory. Choose the Sharp falloff, for example.

7. Press the G key, but don't move the cursor. You should see a small grey circle near the selected points.
This circle tells how far the falloff influence goes.
Press the PageUp key to increase the size of that circle, until the whole octopus is within the circle.
(use "Alt +" / "Alt -" or PageUp/PageDown or the mouse wheel to increase/decrease the size of the circle)
Then, move the selected points as shown on the image. You can press the "o" key again to disable the falloff mode.

8. We will now make the head of the octopus. Select (B) all the points at the top of the shape, and extrude them a little (E, Extrude - Only Edges).

9. Extrude them twice more, and resize (S) the last extrusion to make it smaller.

10.
Extrude the points a last time, and then resize them to make it look as if they were only a single point.
Then, on the edition menu, on the Mesh Tools box, increase a little the
"Limit" and click on "Rem Double". This will remove the points that are
almost at the same place, and keep only one single point at the top of
the octopus head. ("Limit" specify the maximum distance where the
points/vertices would be considered a doubled).
You can also use Ctrl+M to merge the points at their center.

----------

This work is licensed under a
Creative Commons Attribution-Share Alike 3.0 Unported License.


/http%3A%2F%2Fstorage.canalblog.com%2F98%2F82%2F574603%2F36207057_o.png)
/http%3A%2F%2Fstorage.canalblog.com%2F60%2F52%2F574603%2F36166954_o.png)
/http%3A%2F%2Fstorage.canalblog.com%2F17%2F98%2F574603%2F36158765_o.png)
/http%3A%2F%2Fstorage.canalblog.com%2F60%2F14%2F574603%2F36157979_o.png)